How Best to Rip and Manage Your Own (legally purchased) DVDs to create your own Netflix Instant
By EricMesa
- 10 minutes read - 1922 wordsI had two reasons for starting this project:
- my wife and I like to collect Disney movies from our youth. These movies are most likely to be watched by kids and kids are likely to damage DVDs. I’ve heard lots of anecdotes on the net from parents who are on their fourth purchase of the same movie. That’s just silly! Also, Disney’s always putting their movies “back in the vault” so if your kid messes up one of THOSE movies, you could be SOL for up to a decade
- Let me tell you a story of how ridiculous things have gotten in my house thanks to Netflix Instant. My wife owns all seven seasons of Buffy the Vampire Slayer on DVD. However, she does not watch these DVDs. She watches it on Netflix Instant. Why? Because it’s easier for her to go on Netflix and find the episode she wants than to try and remember what season has what episode and go get that, take it out of its case, and put it in the DVD player.
If I can go off on a quick tangent - the movie studios might read #2 wrongfully conclude (as I’ve seen WB do before) that this means they should keep their stuff off of Netflix instant. No, what it means is that people want the convenience of Netflix Instant with the movies they buy. We would NEVER go look for a CD to play music anymore. It’s all on our computers in Amarok or iTunes or Rhythmbox and we can easily search for an artist or a song and not have to worry about what CD it’s on. This is what people want in their homes! Yet the movie studios have killed every company that’s tried to do it. Well, no wonder people are using Netflix vs buying movies nowadays! Sheesh! OK, rant over.
So the first thing you need to do is rip your movies. Let me stress YOUR movies. Do not do this with rented movies. Don’t be a jerk. Buy movies or borrow them. OK, the best program for this is handbrake. I’m not 100% sure, but I don’t know if it can handle ripping movies on Windows because it might be missing the decryption file. But I know it works very well on Linux. You want to use the Matroska (mkv) container. The biggest reason for using this container is that it will give you all the features of a DVD! That’s awesome, right? You don’t have to give up anything - and that will technically make this a BETTER solution than Netflix Instant. By choosing mkv you can have subtitles, different audio tracks, and chapters! So don’t use those other containers that are more like going back to VHS!
For the video codec I use H.264 - it’s the latest and greatest and it’s what the industry uses in nearly everything. In fact, it’s one of the codec standards for Blu-Ray. I use the video settings constant quality RF: 16 to get a good balance between file size and quality. I spent about a week playing with the settings to make sure I wasn’t losing too much quality. In the audio settings I always make sure to get every single audio source and I do the same with captions. Sure, you might THINK you don’t want french language and chinese subtitles now, but what about in the future when you want to use the movies to learn a foreign language? This is a time-consuming process so you want to do it right the first time. You may see “English” in there a bunch of times - usually that means one of those tracks is the commentary. Again, include it - even if you never listen to them - you might want to one day. Finally, go to chapters, tick the box and fill in the chapter names. Now, this is a very optional step, but some video players (like VLC) will actually display these chapter names, so if you think you might want to reference a chapter by its name, fill it in - it usually only adds a couple minutes of prep time. One more thing, change the filename to the name of the movie. If it’s a movie that shares its title with a bunch of other movies, you might want to put the year after it. For example: The Jungle Book 1965.mkv Then just hit start and go do something else - depending on the speed of your DVD drive and the speed of your processor, this might take anywhere from 1 hour to 5 hours per movie. The good thing is that if you have a relatively modern computer, you can do other stuff while you wait for the rip to happen.
If you’re ripping a TV show, you want to do things SLIGHTLY differently. For most American TV shows, each show is represented as a “title” on the DVD. So you pick the first title and adjust the settings as above (by the way, you probably want to save it as a profile so you don’t have to fill it in every time). This time you want to name the file like this: TV Show Name S01E01.mkv where the number after S is the season and the number after E is the episode number. For maximum efficiency while you’re away, I suggest adding the video to the queue and then changing the title to the next title and changing the filename (say to TV Show Name S01E02.mkv) and adding that to the queue. Going all the way until you’re done. Some gotchas to watch out for: Handbrake tries to guess which title you want to rip. For movies this works well - it always picks the longest one. For TV shows it might pick the third one, so make sure it’s the first one before you end up with mislabeled episodes. Also, use some common sense. For Buffy, for example, the episodes are ~45 minutes long. So you only want the titles that are ~45 minutes long. The ones that are 5 minutes long are either the FBI warning, the previews, or special features. You can capture those if you want, but don’t name them episodes.
For Anime, they tend to want to just put all the episodes into one title. So there’s a LITTLE bit more work involved. What I do is take a pen and paper and load the DVD up into VLC. Then I skip through the chapters to see which chapters go with which episodes. Then you go back to Handbrake and change the chapters that go into each episode. For the last one, make sure you actually verify where it ends because, for example, on Tenchi in Tokyo, the last 4 chapters are the credits in English (instead of Japanese).
Alright, so you have all or some of your movies and TV shows ripped. Excellent! Now create two folders: movies and tv shows. You can put all the movies into the “movies” folder and all the TV Shows into the TV Shows folder. For the most part you can leave the movies alone, but I like to organize them into Disney movies, Live Action, etc. That gives you an advantage later and I’ll mention that when we get to it. For TV shows you want to put all the episodes of each TV show into it’s own subfolder, eg: Buffy The Vampire Slayer, Da Ali G Show US, Neon Genesis Evangelion, etc. You can then create subfolders for the seasons if it’ll help keep long shows from being cluttered, but it’s not necessary because the program we’re going to use doesn’t care about that for finding information about the shows.
Now, the final step before we get to the program involved. if you’re in a house like mine where people are going to be watching TV in multiple rooms, share out the folder to other computers. If you don’t trust everyone else in your family not to accidentally delete your movies, just share it out read-only.
OK, now we’re ready for displaying our movie collection. XBMC started out as a media center for the original X-Box. Now, it no longer runs on the X-Box, but it runs on Mac, Windows, and Linux! So no matter what type of computer you want to hook up to your TV (or watch at your desk) you’re fine! It looks and works so great, that Boxee used it as the starting point for their product! As I’m writing this, a new version is about to come out, but here’s how the home screen looks in the current version:
(image)
So, now we need to add sources. Go to videos and add sources. You set each folder as a movie or TV folder which helps XBMC know whether to look in IMDB or TheTVDB to find information about your rips as well as movie covers. Here’s where it might have been useful to create subfolders for your movies and/or TV Shows. You can add in folders anywhere on your computer as a source. So if you’re creating an XBMC frontend for your kid’s room, you could just add in the folders that have Disney movies and until he or she is old enough to figure out how to add their own sources, you won’t have to worry about them seeing rated R movies - even better than Netflix!
So now that you have your sources added, you can go to your videos section. It’ll take a minute or two for XBMC to grab all the information from your TV shows and movies, but that’s OK. We can put the finishing touches on making this a Netflix-like experience for you and those less technically savvy members of your household. You want to pick these settings: “view: media info” And viola, it looks like this:
[caption id=“attachment_5465” align=“aligncenter” width=“500” caption=“Default XBMC skin - media info view on movies”] 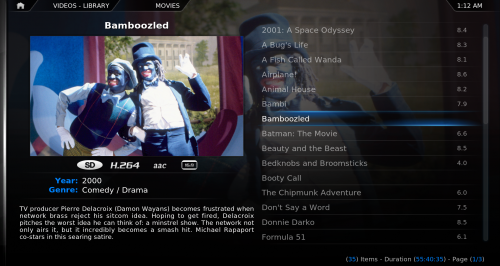 [/caption]
Not bad, eh? Want info on your movies?
[caption id=“attachment_5466” align=“aligncenter” width=“500” caption=“Default XBMC skin - media info view on movies - even more info”] 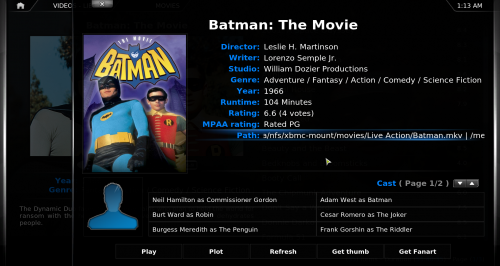 [/caption]
TV shows?
[caption id=“attachment_5467” align=“aligncenter” width=“500” caption=“Default XBMC skin - TV Show list”] 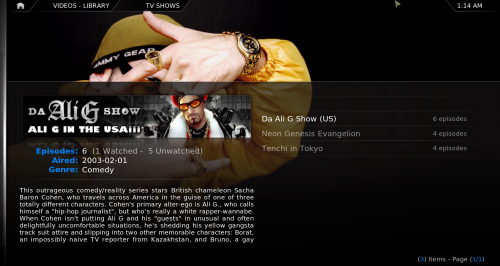 [/caption]
[caption id=“attachment_5468” align=“aligncenter” width=“500” caption=“Default XBMC skin - TV Episode list”] 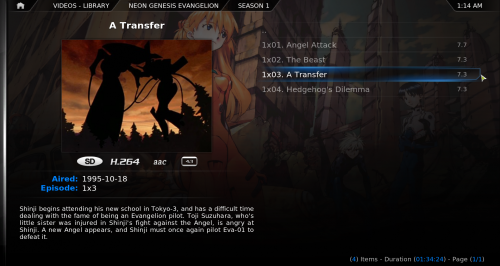 [/caption]
Want to search by all these categories?
[caption id=“attachment_5469” align=“aligncenter” width=“500” caption=“Default XBMC skin - categories to search by”] 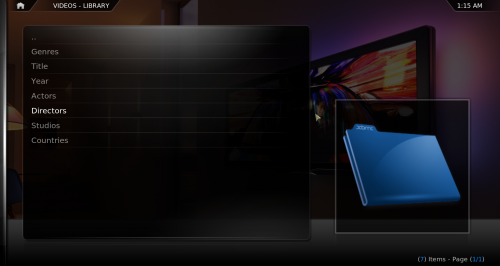 [/caption]
Here are some views with the Back Row skin.
[caption id=“attachment_5470” align=“aligncenter” width=“500” caption=“Back Row XBMC skin - showing latest movies added”] 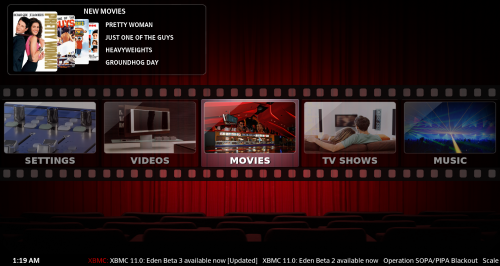 [/caption]
[caption id=“attachment_5471” align=“aligncenter” width=“500” caption=“Back Row XBMC skin - showing latest episodes added”] 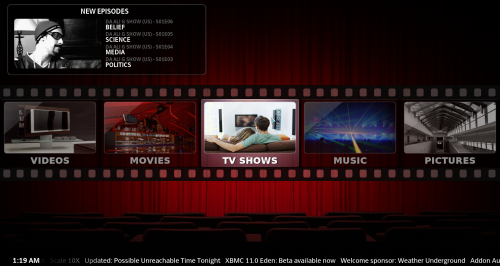 [/caption]
Nice, right? But here’s where it’s better than Netflix. When you’re watching a movie go to this menu to change the audio streams and the subtitles:
[caption id=“attachment_5472” align=“aligncenter” width=“500” caption=“Default XBMC skin - choosing captions and languages”] 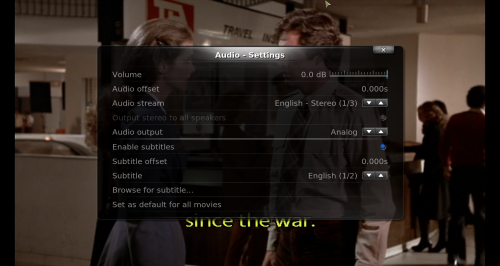 [/caption]
Also, you can skip chapters! Can’t do THAT with Netflix! And everything loads up so much faster than Netflix! And that’s not even all the coolness involved! You can control it with a regular remote (you need an IR receiver on your computer). That’s OK. Standard. You can control it with a bluetooth remote like your PS3 remote - that’s neat…. But coolest of all, you can control it with your Android phone!
So there you go, your very own local Netflix instant. You can put all those DVDs away in your basement so they can stop collecting dust. Never worry about kids or pets messing up your DVDs again.