Empathy's Still Around....A stalemate
Last time I spoke about Empathy, I was a little disappointed in the project. I really liked Pidgin and it felt like they were being stabbed in the back, even if everything the Empathy team was doing was koser GPL-wise. At the time I didn’t give it a second look because it was still missing a bunch of features. It’s been 2 years, or 4 releases of Gnome, since then and the project has come a long way. It now supports all the protocols that Pidgin does (and more) and everyone seemed to think it was doing a better job of listening to users, etc. Now, this shouldn’t make a huge difference unless I missed something, but I’m reviewing 2.30 as Fedora 14 hasn’t come out yet. I’m sure there wasn’t a massive upgrade or anything. So, first of all, here’s what Pidgin looks like.
Enabling Mediatomb on Fedora 13
I have a HUGE music collection that I’ve taken the time to digitize, so it was bugging me that I couldn’t listen to it on my sound system on the first floor. When I raised the volume on my computer speakers I just ended up hearing a ton of bass. So I took a look around the net and it seems that mediatomb is the program to use. It was in the Fedora repos or maybe the RPMFusion repos. It’s pretty easy. You run it as your user (not root) and it creates a config file. All you need to do is tweak that file to have it say:
Customizing the Look of the OS
I forgot what post online got me thinking about this stuff, but I really don’t customize my computers’ desktop environments much. Generally, I tend to change the background image and leave it at that. I took a look over my desktop image gallery here on the blog to confirm my suspicions.
Starting at the bottom with Windows, you can see that until 2009 I was just going with the default look. I tended not to add launchers to my panel because, with Windows XP, it ended up really limiting the space for listen the open programs. I also didn’t have too many launchers on the desktop. I tend to always have programs maximised if I’m in front of the computer, so the only programs shortcuts I’d leave on the desktop are programs I’d be likely to launch upon starting up the computer. In fact, whenever I pay attention, I tell the installer not to put icons on the desktop.
Grand Canyon: 9 Oct 2010
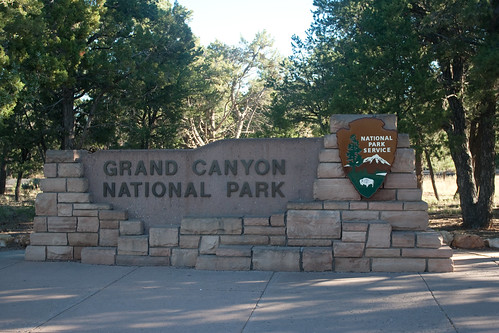
While on my trip to the Grand Canyon I kept a journal of my experience in order to create an after-the-fact travelogue. This is the last entry of an edited version + photo essay of my trip. ( First entry here) --- 9 Oct 2010 1530
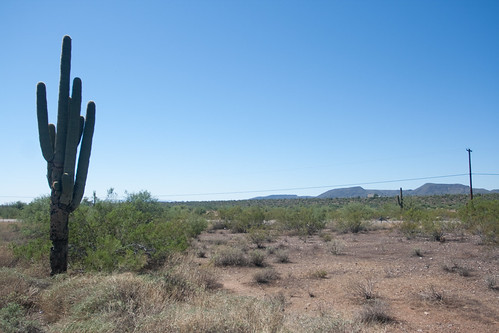
The drive to Phoenix was uneventful. I did finally get a cactus photo.
I also finally got to eat at an In-n-Out Burger after having heard its praises on the Giant Bombcast and countless other west coast podcasts.
Doctorow Review: Eastern Standard Tribe & A Place So Foreign and Eight More

On my trip to the Grand Canyon I read Cory Doctorow’s second novel, Eastern Standard Tribe. The book begins in media res with the main character informing us that he’s in an insane asylum and that he is deciding whether to give himself a lobotomy with a pencil. We also quickly learn he believes himself to be set up. I always find it to provide a very interesting tension when experiencing works of art that begin in the middle. Most of the time, as happens with Eastern Standard Tribe, the current story is interrupted to tell how we got here. Of course, this leaves the reader (or watcher in the case of a movie) playing the mental game of trying to figure out how we end up back at the beginning. You know the main character can’t die (unless it’s a work in which resurrection is allowed - plus some other ways that writers can be tricky and mean) and you know that no matter where he ends up going, he’ll end up in the location at the beginning. Regular books, as you know, leave you in the dark about where you’re headed. Doctorow chooses to tell the story in the same manner of Momento, switching between the past and the present, rather than focusing on the past until we’re caught up. This technique made it fun because even as you see how he ends up imprisoned, you are seeing his plans for getting out.
Grand Canyon: 8 Oct 2010 Part 2
While on my trip to the Grand Canyon I kept a journal of my experience in order to create an after-the-fact travelogue. Presented over the next few days is an edited version + photo essay of my trip. ( First entry here) ---
8 Oct 2010 2051
I feel completely differently at the end of today. My feet don’t hurt and I’m not exhausted. I have some mild aches in my legs and very mild aches in my feet. It’s because today was a much milder day.
Grand Canyon: 8 Oct 2010 Part 1
While on my trip to the Grand Canyon I kept a journal of my experience in order to create an after-the-fact travelogue. Presented over the next few days is an edited version + photo essay of my trip. ( First entry here) --- 8 Oct 2010 0720
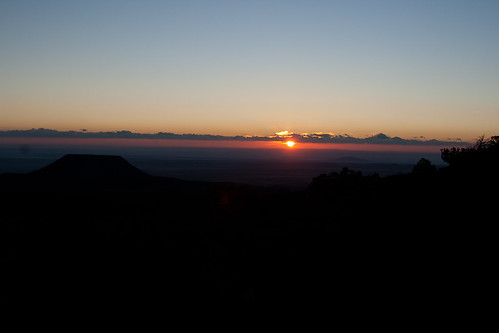
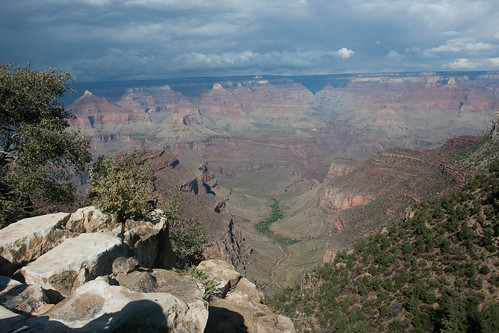
Yesterday was awesome and today I have the sore legs to prove it. My legs have not been in this much pain in a long time. I’ll get to the cause of that in a moment. First of all, we went yesterday to see the sunrise3 at Desert View (near the Watch Tower). Let me stress again that the park is huge! We got up at 0430 and ended up nearly missing the 0600 sunrise. We arrived at the inner part of the park at 0520 and I thought we’d be at Desert View by 0530 (my target time to arrive). But no, from the South Entrance near the visitor center, it’s 25 miles to Desert View! We made our way through the pitch black roads and ended up in the parking lot by 0550. The drive was extra nervous as we saw the sky getting brighter and brighter despite not yet having arrived. Then we had to frantically find our way to the lookout. It was dark and even the outlook area was huge! We got there as the sun was just getting ready to peek out. The sunrise was magnificent, but I’m not sure any of the photos can match how amazing it looked. Surprisingly enough, there was only one couple there. A family later arrived.
Early October Photojojo Time Capsule
Apparently I always go to National Parks in Oct, because last Oct I went to Shenandoah National Park. So all but one of the photos are from that trip. The time capsule is available online here if you want to see how to setup your own.
Grand Canyon Trip: 6 Oct 2010 Part 2
While on my trip to the Grand Canyon I kept a journal of my experience in order to create an after-the-fact travelogue. Presented over the next few days is an edited version + photo essay of my trip. ( First entry here) ---
6 Oct 2010 2022
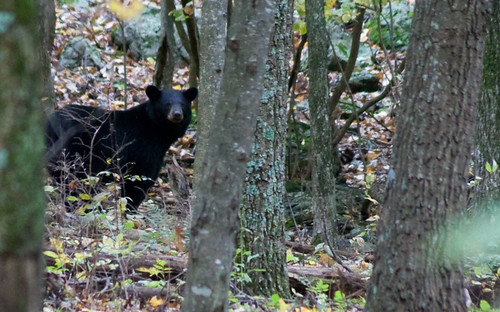
Today was both overwhelming and underwhelming. Overwhelming because of how massive the park is. We barely scratched the surface and yet we felt very tired at the end of the day. Overwhelming at how many different nationalities were present. We heard french, german, japanese, vietnamese, and The Queen’s English. There was a constant cycling of tourists foreign and domestic at the Grand Canyon Village. To stand there is to constantly be surrounded by Grand Canyon green horns. It was also amazing to see so many animals. We saw a neat type of squirrel, a mouse/chipmunk thing, dear, a woodpecker, and a beautiful blue bird. It was so awesome - especially the blue bird. At the end of the day, it was amazing how dark it was and how many stars there were in the sky. Unfortunately, I didn’t have a camera that could properly capture the night sky. That’s why I want to get a film 35mm Canon camera.
Grand Canyon Trip: 6 Oct 2010 Part 1
While on my trip to the Grand Canyon I kept a journal of my experience in order to create an after-the-fact travelogue. Presented over the next few days is an edited version + photo essay of my trip. ( First entry here) ---
6 Oct 2010 0638
I forgot to mention yesterday how neat it was to see cacti in the wild. It’d seen them in arboretums and botanical gardens, but this was the first time I saw them growing in their natural environment. Biggest impression: unlike cartoons, the “arms” are not even. Some of them even have only one “arm”.