
Because I’ve been busy with programming and other tasks (including getting re-addicted to Cities: Skylines), I’ve got a roundup from about the last week or so in programming.
Python
Python Morsels
I got the mid-tier of the Pycharm Humble Bundle which came with a bit of a subscription to Python Morsels. Every week Trey Hunner, a Python trainer, sends subscribers a problem to solve along with a few bonus questions to deepen the learning. Here’s what I’ve loved so far:
- Trey provides a unit test file that I run against my code (he also has a Python interpreter built into his website that will do this for the user, but I save that for the end). If I get stuck, I can examine the tests to see what it’s looking for
- I’ve set my problem set to “Mixed” which is a combination of Beginner and Advanced. While I’ve been programming in Python for almost 15 years, it’s all been at a self-taught amatuer level, so I’m missing some of the special Pythonic knowledge
- Speaking of that! This site teaches you to write Pythonic code and so I’ve learned quite a few things after only 3 exercises – features of the language I didn’t know were there!
- What I love most about the way that Trey has set up this site is that he provides a series of hints at the bottom that are links to documentation and talks about the concepts the problem is trying to get you to solve. Based on the way I program, this is an awesome way to build up your skills for your own coding. When you’re trying to figure something out – being able to read through documentation or talks can really help you learn the concept you’re struggling with.
I’ve set up a repo at https://github.com/djotaku/pythonmorsels where I’m keeping track of my solutions to the problems as well as what I learned from each section of the problem. I’m hoping this leads to retaining the knowledge a little better and providing a resource that I can go back if I want to remember just how “zip” worked.
Enviro
I did a bit of extra tinkering with my enviropi bonnet to have it only display if I tell it to and to only push to MQTT every 10 seconds. The former is to try and extend the life of the LCD (99% of the time – almost literally – no one is in there to see the screen). The latter is because Home Assistant doesn’t have any (I forget the proper term) data trimming, so pushing data every time the enviropi looped was creating a situation where Home Assistant would choke on graphs that contained the data.
CircuitPython
Simon
My first foray into the CircuitPython dialect was to create a clone of the game Simon that I’d had as a kid. I worked on the project with Sam and one of the kids’ Circuit Playgrounds. Since Sam isn’t quite ready to read code syntax, he typed in the numbers.
import random
import time
from adafruit_circuitplayground.express import cpx

cpx.pixels.brightness = 0.1

REGION_LEDS = (
    (5, 6, 7), # yellow region
    (2, 3, 4), # blue region
    (7, 8, 9), # red region
    (0, 1, 2)) # green region

REGION_COLOR = (
    (255, 255, 0), # yellow
    (0, 0, 255), # blue
    (255, 0, 0), # red
    (0, 255, 0) # green
    )

REGION_TONE = (
    252, #yellow sound
    209, # blue sound
    310, # red sound
    415 # green sound
    )

PAD_REGION = {
    'A1': 0, # yellow
    'A2': 2, # red region
    'A3': 2, # red region
    'A4': 3, # green region
    'A5': 3, # green region
    'A6': 1, # blue region
    'A7': 1 # blue region
    }

def light_region(region, duration=1):
    # turn the LEDs for the selected region on
    for led in REGION_LEDS[region]:
        cpx.pixels[led] = REGION_COLOR[region]

    # play a tone for the selected region (plays tone frequency in Hertz
    cpx.start_tone(REGION_TONE[region])

    # wait the requested amount of time
    time.sleep(duration)

    #stop the tone
    cpx.stop_tone()

    # turn the LEDs for the selected region off
    for led in REGION_LEDS[region]:
        cpx.pixels[led] = (0, 0, 0)

def read_region(timeout=30):
    val = 0
    start_time = time.time()
    while time.time() - start_time < timeout:
        if cpx.touch_A1:
            return PAD_REGION['A1']
        elif cpx.touch_A2:
            return PAD_REGION['A2']
        elif cpx.touch_A3:
            return PAD_REGION['A3']
        elif cpx.touch_A4:
            return PAD_REGION['A4']
        elif cpx.touch_A5:
            return PAD_REGION['A5']
        elif cpx.touch_A6:
            return PAD_REGION['A6']
        elif cpx.touch_A7:
            return PAD_REGION['A7']
    return val

def play_sequence(sequence):
    # play back a sequence of lights/tones input as a list
    duration = 1 - len(sequence) * 0.05
    if duration < 0.1:
        duration = 0.1
    for region in sequence:
        light_region(region, duration)

def read_sequence(sequence):
    # read the player's inputs and compares against the sequence
    for region in sequence:
        if read_region() != region:
            # the player made a mistake!
            return False
        light_region(region, 0.25)
    return True

def play_error():
    # play error tone if the user messes up
    cpx.start_tone(160)
    time.sleep(1)
    cpx.stop_tone()

def play_game():
    sequence = []
    while True:
        sequence.append(random.randint(0,3))
        play_sequence(sequence)
        if not read_sequence(sequence):
            # game over!
            play_error()
            break
        time.sleep(1)


while True:
    play_game()
Scratch
Scarlett’s Gravity Simulator
Two weeks ago, the Raspberry Pi foundation’s create at home theme was Space. I decided the best project for Scarlett would be the gravity simulator so that we could make it into a science lesson as well. I’m not sure she internalized all the concepts, but I know for my own learning, the more often I come across a topic, the more I can pick up each time because I’m not so overwhelmed by all the concepts. This Scratch project was slightly more challenging than others I’d done with the kids because the tutorial was written for an older version of Scratch and not in their new format where they show the blocks and have checkmarks per step. So we had to slightly convert the concepts over to Scratch 3. Here’s the code:
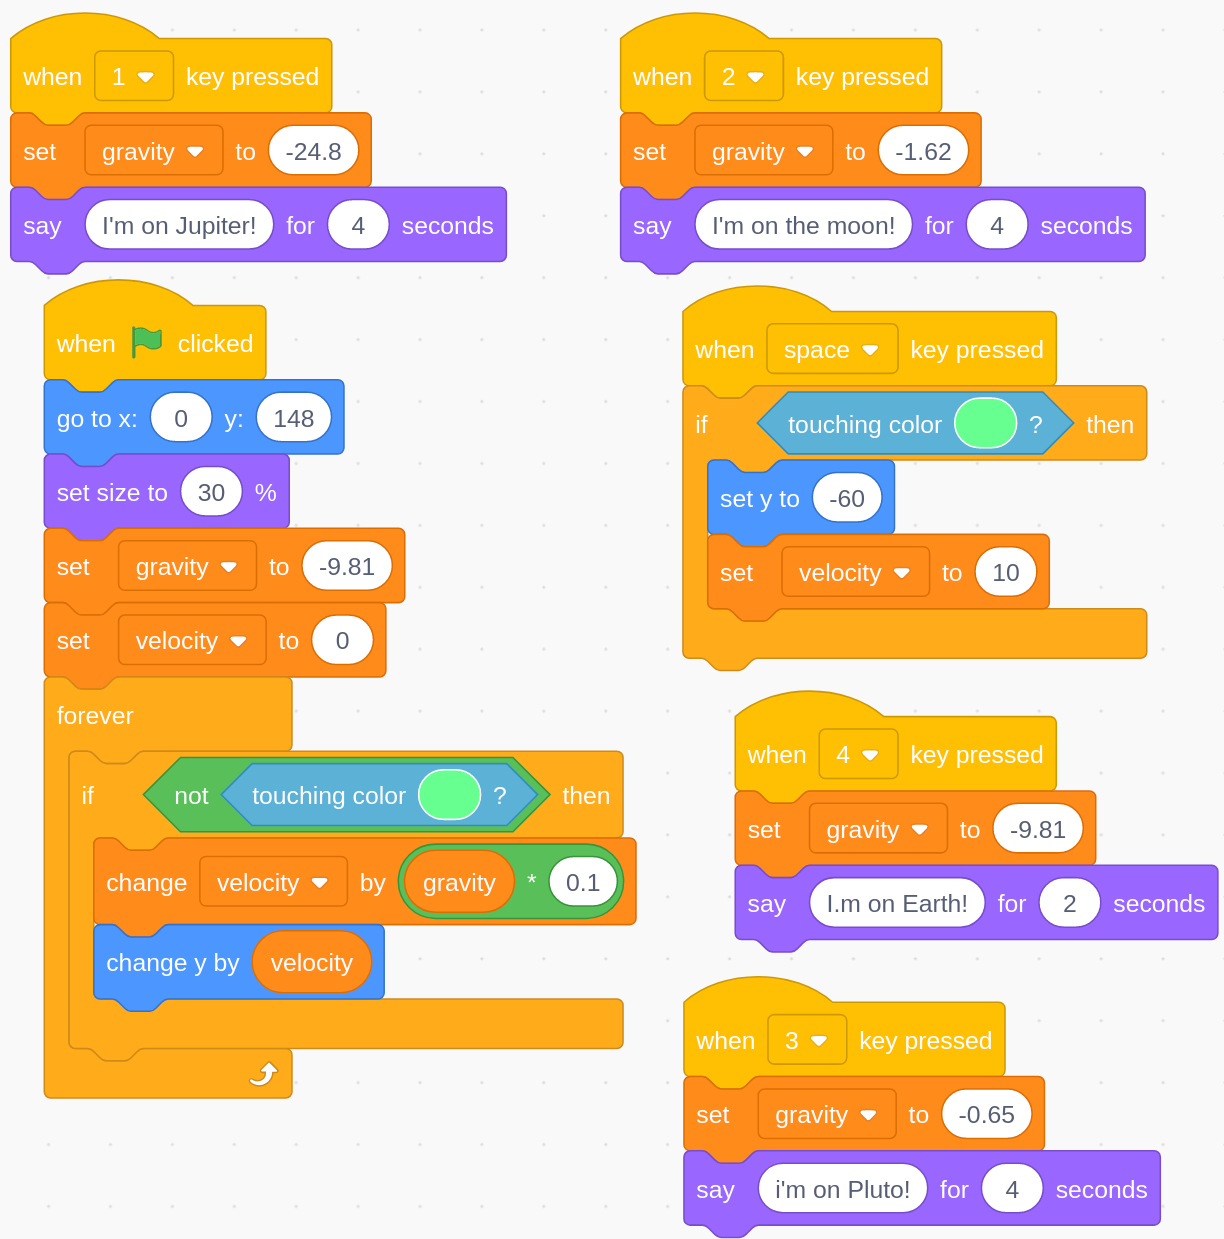
And here’s a video of it in action:
Scarlett’s Asteroids Game
If you’ve been watching my programming YouTube videos, you know that I’d like to make an Asteroids clone. Scarlett beat me to it with this week’s Raspberry Pi Foundation focus on retro games. Unlike their usual setup, there weren’t text instructions, just a YouTube video. I’d pause it before they pulled blocks out and ask Scarlett what she thought should go in. She seems to be starting to get a feel for things. That said, what she loves most is the artistic aspect of creating the games. Here’s the code:
lightning code 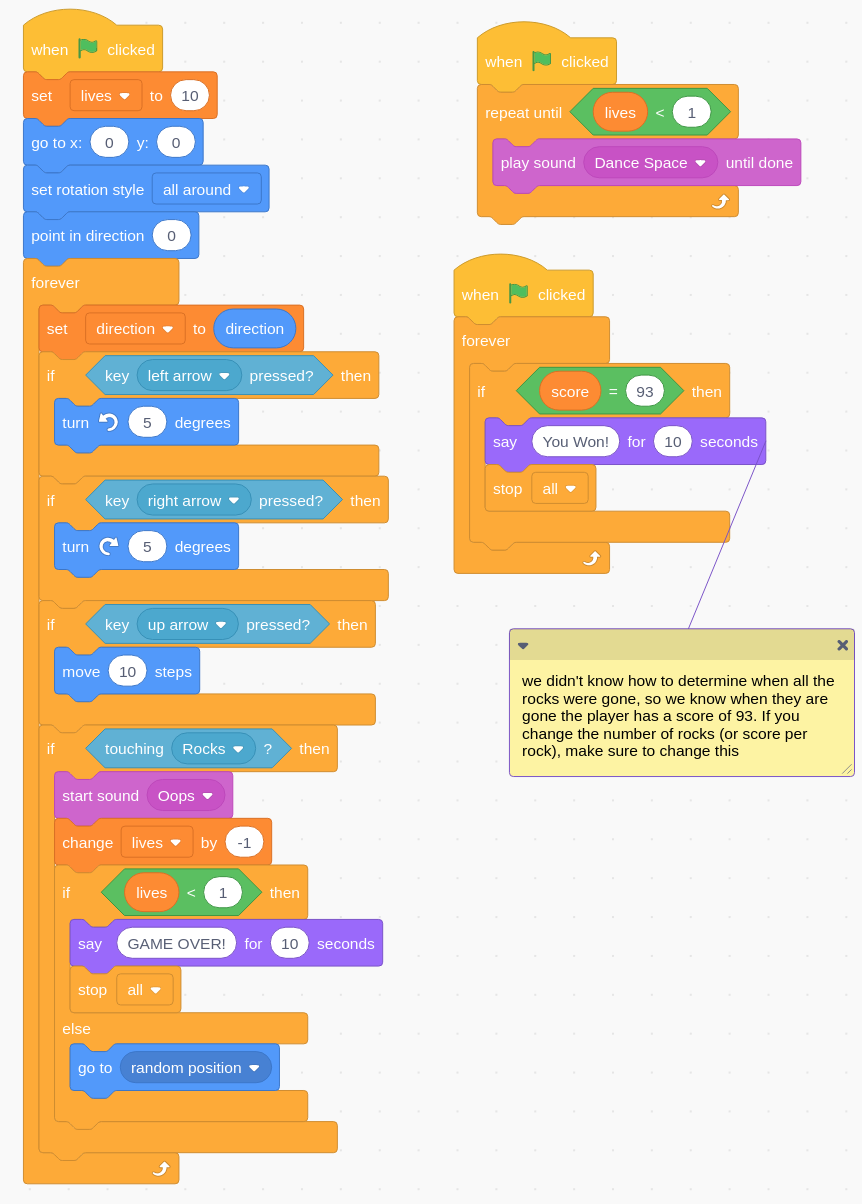
Rocketship Code 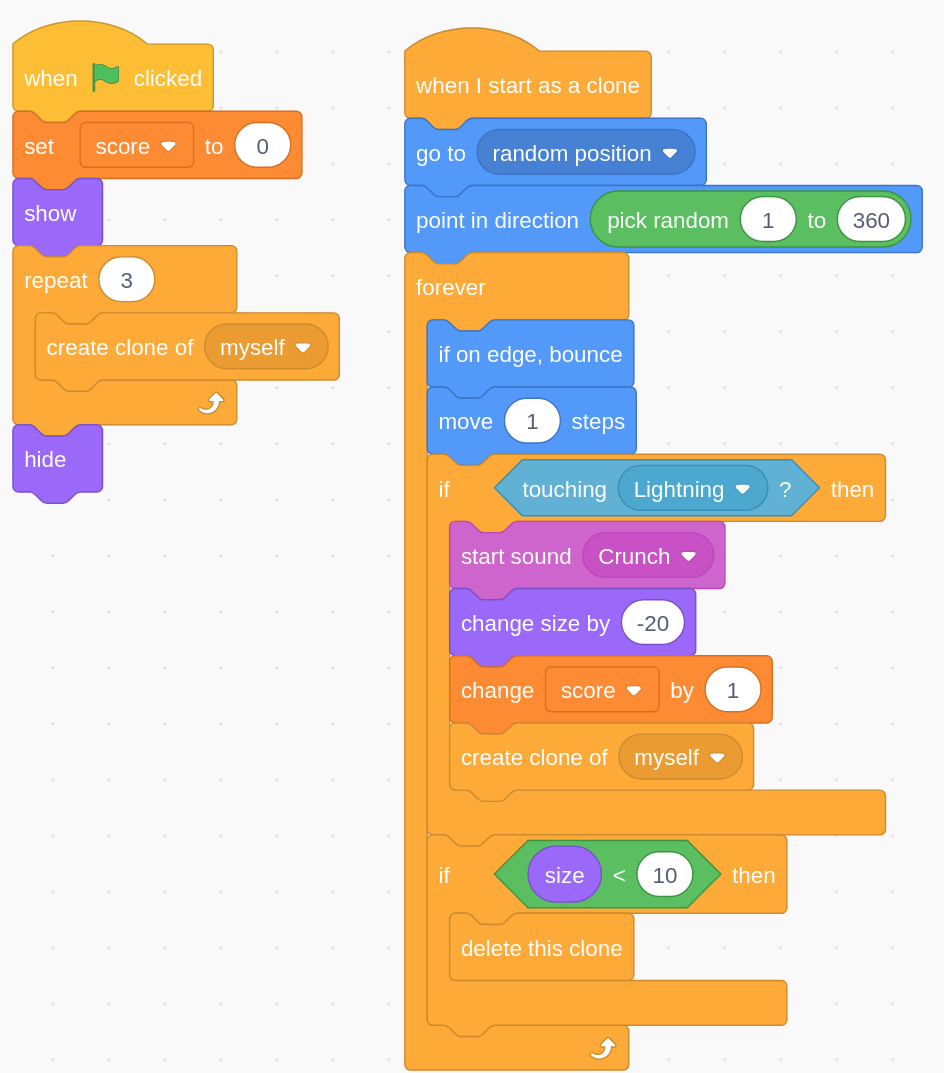
Rock Code
And here’s a video of it in action:
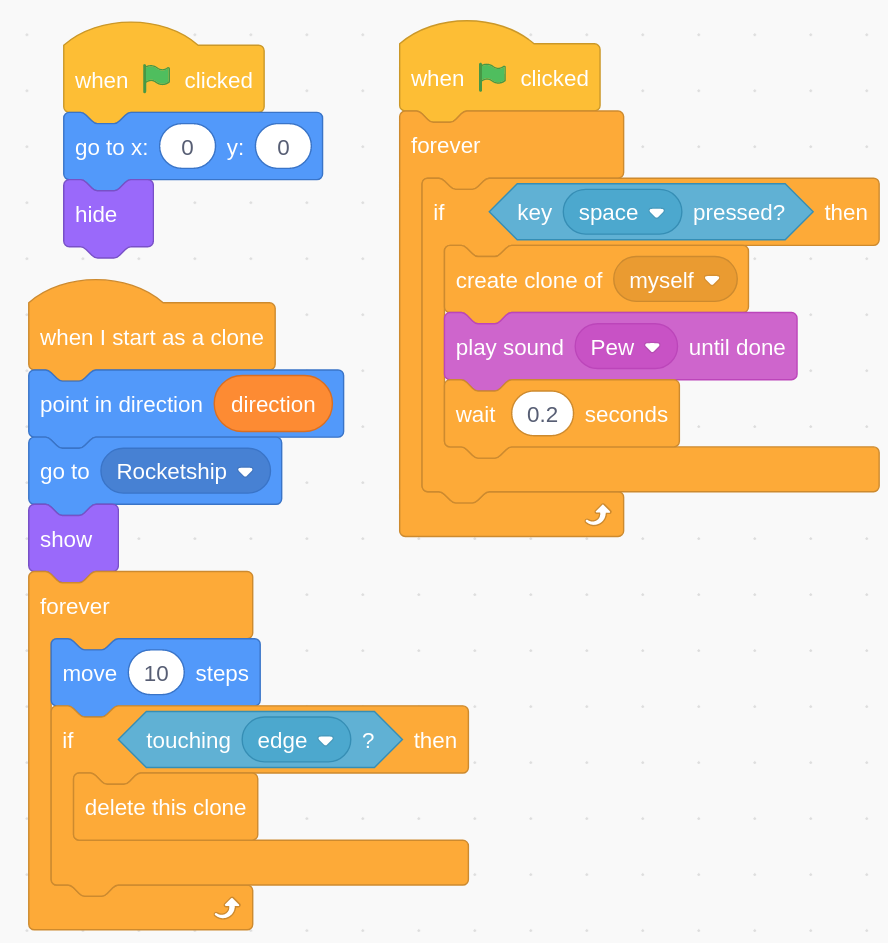
Sam’s Flappy Parrot Game
Continuing on with the Raspberry Pi Foundation’s retro games week was a clone of Flappy Bird. Sam and I worked on this one. Just like the Asteroids clone, this one made use of the clone block which was new to me this week. Here’s the code:
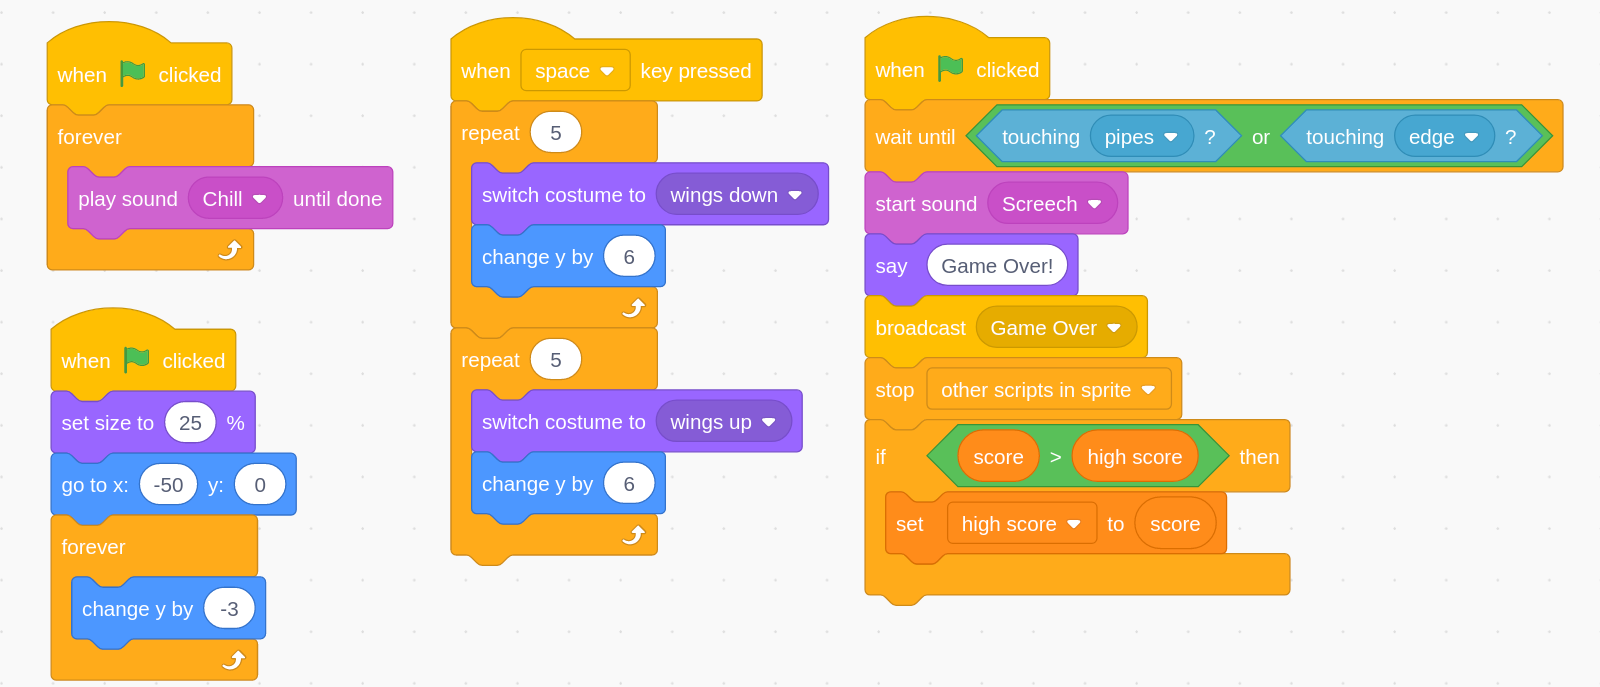
Parrot Code 
Pipe Code
And here’s a video of it in action:
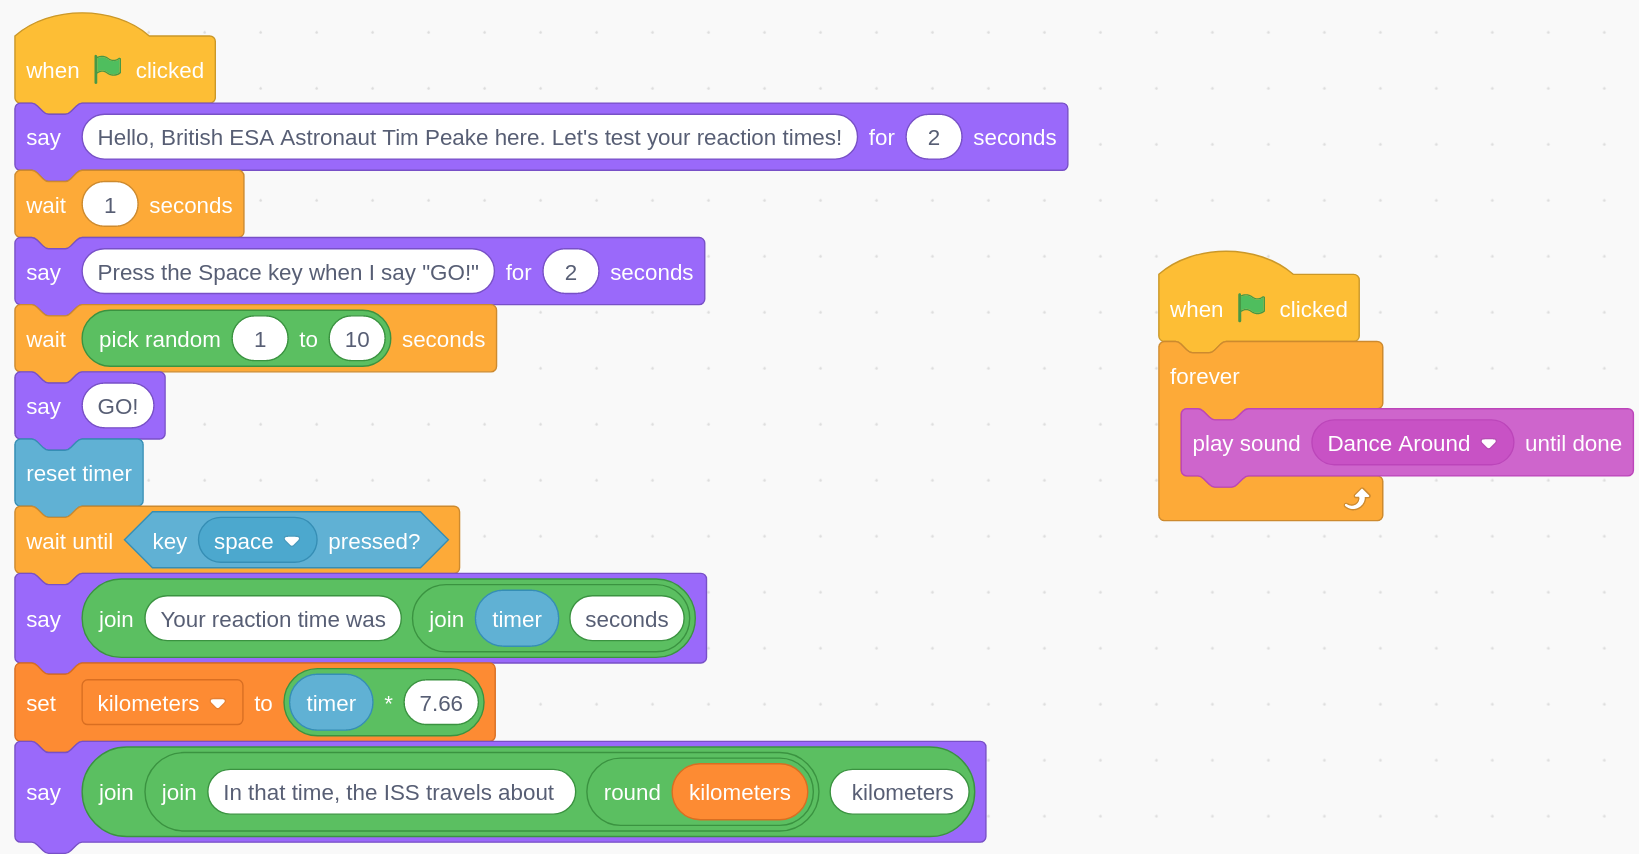
Sam’s Reaction Timer
This time Sam helped me make a reaction timer in Scratch. I had him type each letter in the “say” blocks so he could practice letter identification as well as keyboard position.
And here’s the video:
Arduino
Temperature Monitoring in Scarlett’s room
After taking it for granted that Scarlett’s room was hotter than the rest of the house (from what others had said), I decided to try and confirm with another temp probe. That, coupled with putting it in the bathroom with the Pimoroni and some research that suggested for many people it reported temps as much as 5 C hotter than reality, led me to change the programming for the Arduino MKR WIFI 1010 and ENV shield in her room to subtract 9 degrees F. That led it to be within 1 degree of the Pimoroni in the bathroom. At this level of hobby electronics I don’t expect all sensors to line up exactly (even if they are from the same manufacturer (and I’d have to look to see if these are both BMEs)), so within a degree or two is a good enough sign that I’ve properly set things up.
MakeCode
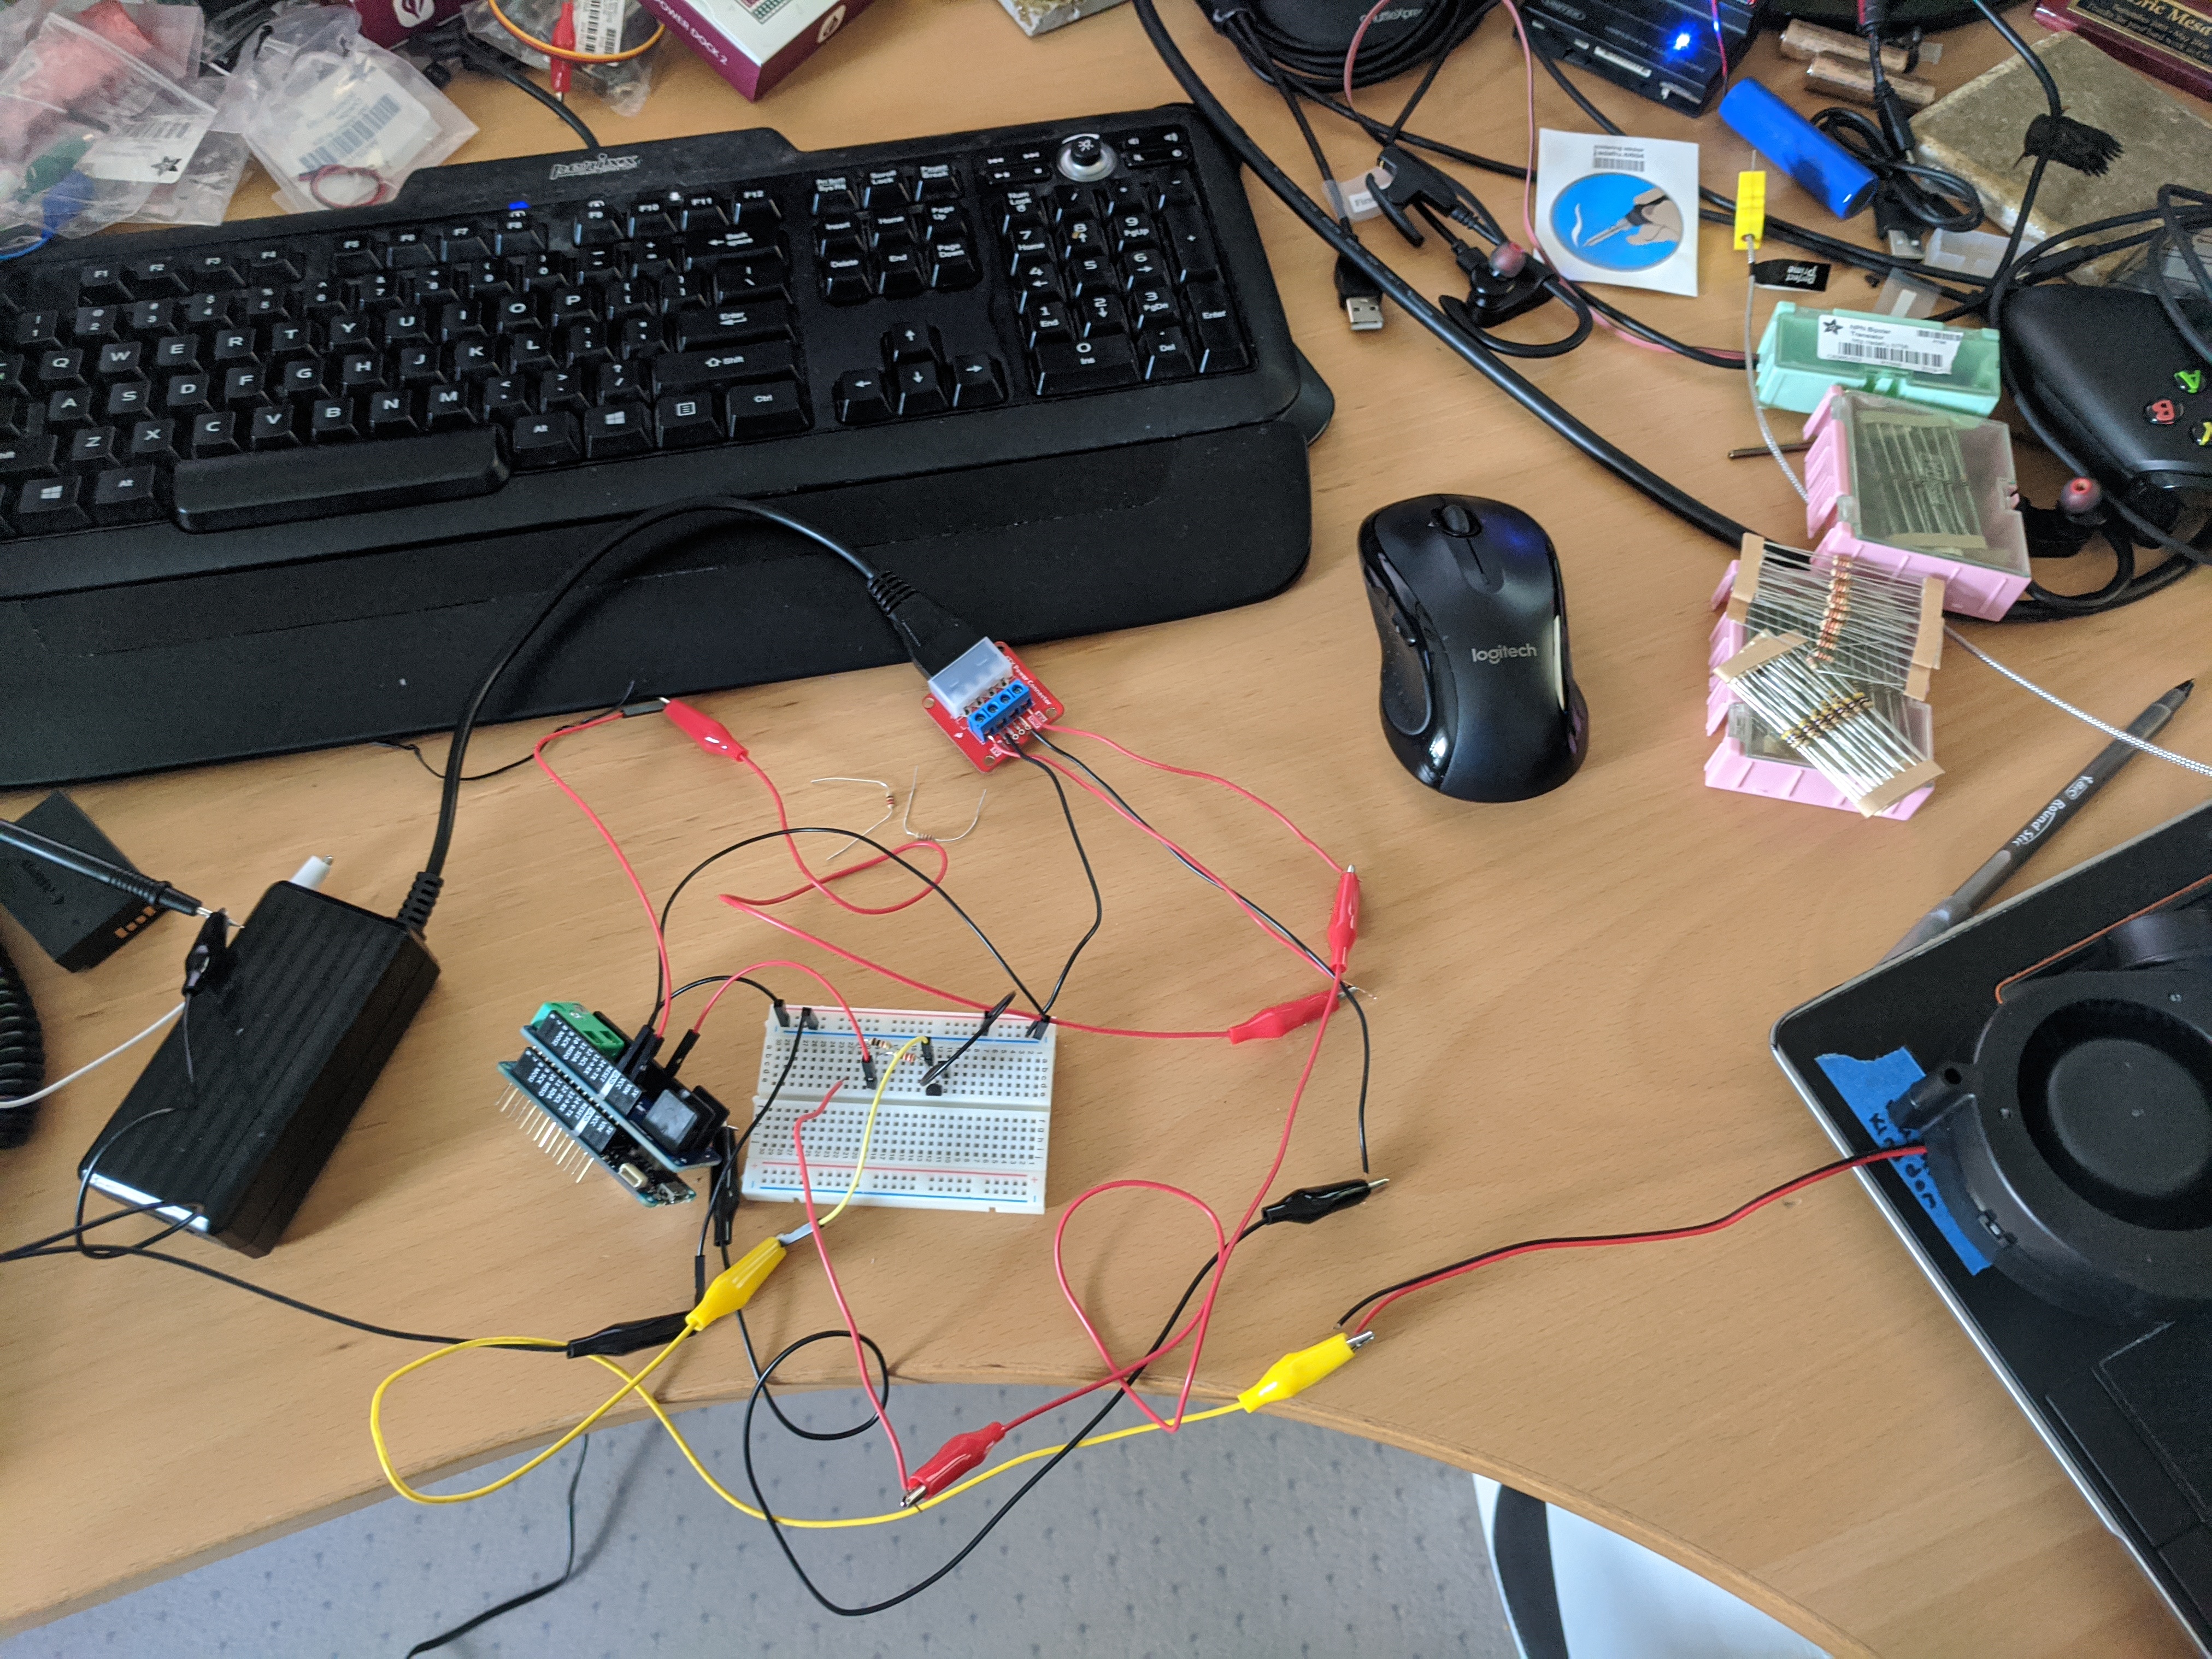
Snake Charmer
I had Stella drag the MakeCode blocks and add in the numbers. This was my first motor project with a dev board and I followed the instructions from the Adafruit Snake Charmer tutorial. Unfortunately, somehow I seem to have busted the audio chip on one of our Circuit Playground Expresses. I’m not sure if it’s because I originally tried it with the 3xAAA battery holder and that didn’t provide enough voltages causing…something to happen. Or maybe somehow the way I connected the alligator clip to wire wires led to a short? The wire end of the wires has an exposed metal part – maybe two of those somehow touched? I know I checked my connections a ton before operating it. The other thing I realized after things weren’t working correctly was that I had accidentally written to the A2 pad without changing to pulse first. Maybe that caused some kind of something along the wires. I’m just too far away from my undergrad classes to remember enough electrical theory to understand what happened. Anyway, it’s a huge bummer, but at least other than sound I don’t seem to have destroyed anything else on the board. (I loaded Scarlett’s Sibling Chooser and Sam’s Simon game and those worked fine other than not producing sound) That said, at least the sound output could be routed to external speakers!
Stella had a blast with it and she was dancing to the music, but I couldn’t capture a good angle of that. Still, I’m excited to do some more involved Circuit Playground Express projects with her over the next couple weeks.